 ultimate-guide
Why In-House Blade Sharpening Fails: 7 Fixable Causes
Table of Contents
- The Real Cost of a Blade That Only Looks Sharp
- Why In-House Blade Sharpening Fails: The Short Answer
- Angle Errors, Burr Retention, and the Grit Mistakes That Kill an Edge
- Signs of Heat Damage on Machine Knives (and How to Avoid It)
- How to Sharpen Wood Chipper Knives Without Damaging Temper
- Industrial Blade Grinding Tolerances Most Shops Never Check
- Tool Maintenance, Safety, and the Bias That Keeps You Sharpening Badly
- Conclusion: When In-House Sharpening Stops Paying Off
- Frequently Asked Questions
Last Updated: September 27, 2026
The Real Cost of a Blade That Only Looks Sharp
A blade that has been ground but not properly sharpened is worse than a dull one. It cuts just well enough to pass a visual check, so it goes back into the machine, and the damage starts: the operator compensates with feed pressure, the motor works harder, the cut quality drifts, and the blade returns days later, thinner than before. This guide covers why in-house blade sharpening fails, from angle errors to heat damage to the cognitive bias that keeps a shop repeating the same mistake.
Why In-House Blade Sharpening Fails: The Short Answer
In-house blade sharpening fails because of three categories of error, and most shops only investigate one. User error covers angle inconsistency, uneven stroke pressure, and skipping the burr. Tool failure covers dished stones, worn jigs, and grinding wheels that have lost their form. Material limitations cover steel too hard for the abrasive on hand, or a bevel geometry the machine cannot reproduce.
Angle Errors, Burr Retention, and the Grit Mistakes That Kill an Edge
Three technique failures account for most ruined edges: the wrong angle, a burr left on the apex, and a grit progression that jumps too fast. Each produces a distinct symptom, so diagnosis is straightforward.
Incorrect sharpening angle and the marker test
The correct sharpening angle matches the blade's existing bevel angle; changing it removes more steel than necessary and shortens blade life. Freehand sharpening drifts several degrees across a long guillotine or chipper knife because the blade is too long to hold steady by hand.
Burr retention and wrong grit progression
A burr is the thin lip of deformed steel that forms on the opposite side of the edge as you grind. It signals that you have reached the apex, and it must be removed before you move to a finer grit. Leave it on and the edge feels sharp on your thumb but folds over on the first cut.
| Failure | Symptom | Fix |
|---|---|---|
| Wrong angle | Marker removed unevenly; short blade life | Reset angle with the marker test |
| Burr retention | Feels sharp, dulls on first cut | Chase the burr, then deburr at fine grit |
| Grit skipping | Visible scratch pattern; no true apex | Step through grits, erase each pattern |
| Uneven pressure | Wavy bevel, inconsistent edge | Consistent stroke count, lighter finishing passes |
Signs of Heat Damage on Machine Knives (and How to Avoid It)
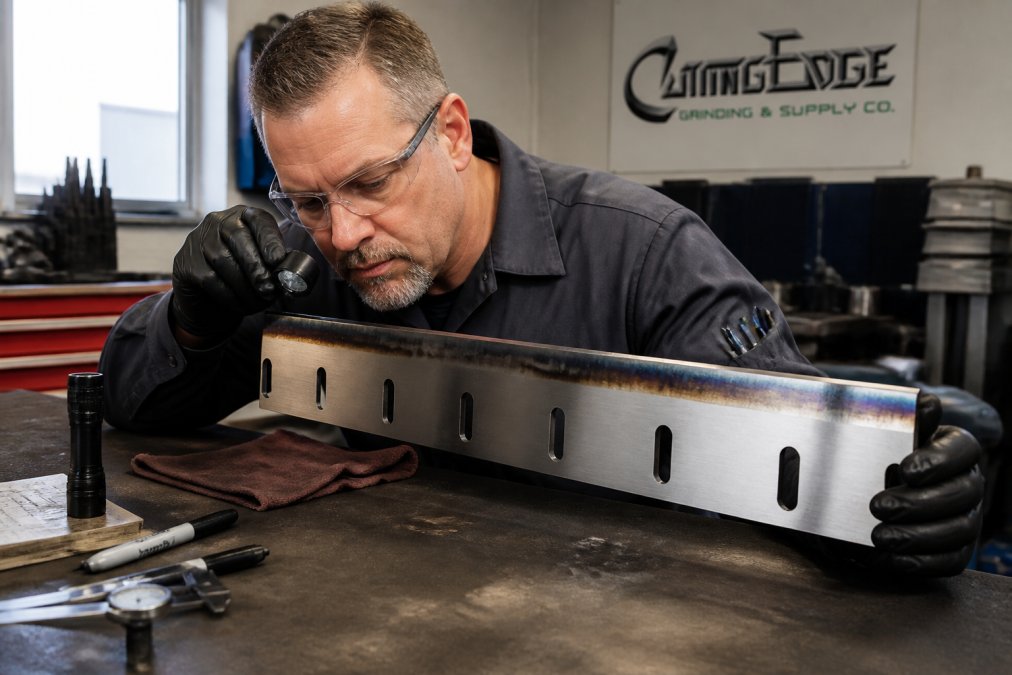
Why the failure mode differs by steel type
This is where most guides stop, and where in-house sharpening actually goes wrong. The two steel families behave differently under the same wheel:
- High-carbon steel (common in guillotine and shear blades) loses hardness at relatively low temperatures and discolors early, so you get a visible warning before catastrophic softening. It also burns more readily, so the window between 'warm' and 'damaged' is narrow.
- Stainless and high-chromium alloys (common in chipper knives and food-processing blades) resist discoloration longer because the chromium content changes how the oxide layer forms. You can soften the edge without ever seeing a clear straw or blue tint, which is why stainless blades often fail with no visible warning.
The mechanism, not just the symptom
Grinding generates heat through friction at the contact point, and the thin edge of a blade has almost no mass to absorb it. The heat concentrates in a band a few thousandths of an inch deep, exactly the zone that does the cutting. That is why a blade can feel cool a half-inch back from the edge while the apex has already been overheated.
How to Sharpen Wood Chipper Knives Without Damaging Temper
Chipper knives demand a different approach because they are long, thick, and usually made of harder steel than a guillotine blade. The temper, the heat treatment that gives the steel its hardness, starts to break down well below the temperature where the steel glows, so you may never see it coming. Keep the blade cool, take shallow passes, and never let the edge heat past the point where you can hold a bare hand near it.
Industrial Blade Grinding Tolerances Most Shops Never Check
Grinding tolerances are the measurable limits a blade must hold to work correctly: flatness, bevel width, edge straightness, and thickness. Most in-house sharpening checks none of these, which is why a blade can come off the machine looking sharp and still cut badly. A dished wheel, for example, produces a concave bevel that never contacts the material properly, no matter how carefully the operator works.
Tool Maintenance, Safety, and the Bias That Keeps You Sharpening Badly
Most guides on sharpening failures focus entirely on the operator's hands. That is a mistake, because three persistent failure sources have nothing to do with technique: the tooling drifts out of spec, the setup becomes unsafe, and the operator's own confidence hides both problems.
Tool maintenance and calibration: the failure nobody measures
Sharpening tools degrade in ways invisible until you measure them. A hard-used grinding wheel loses its flat face and develops a dish or crown. A jig wears at the pivot and stops holding the angle it was set to. A stone develops a hollow in the middle from years of the same stroke pattern.
A practical calibration routine:
- Dress the wheel before every session, not when it looks bad. A freshly dressed wheel cuts cooler and flatter, which also reduces heat damage.
- Check the jig against a known reference at the start of each batch. If the set angle no longer matches the measured bevel, the jig has moved.
- Flatten water stones on a diamond plate or flattening stone regularly. A dished stone cannot produce a flat bevel no matter how steady the hand.
- Log the results. Bevel width at three points along the blade, measured with calipers, is the single best early-warning signal that tooling has drifted.
Safety failures are usually maintenance failures in disguise
Improper sharpening technique is a genuine deterrent to in-house work, and the injuries are predictable. An out-of-balance wheel can grab a blade and throw it. A jig that slips mid-stroke can send the edge into the operator's hand. A blade too long to control on a bench stone invites a slip at the worst moment.
The bias that keeps a shop sharpening badly
The hardest failure to fix is cognitive. Shops that have sharpened in-house for years assume their process is sound and blame the blades, the steel, or the operator when results slip. This is well documented: the less a person knows about a skill, the more confident they tend to be, and sharpening is a textbook case because the feedback is delayed and ambiguous.
Conclusion: When In-House Sharpening Stops Paying Off
In-house sharpening stops paying off when the cost of the failures, ruined blades, scrapped product, and downtime, exceeds the cost of sending the work out. If you have corrected your angles, chased the burr, controlled the heat, and still cannot hold tolerance, the problem is your tooling, and that is where professional precision sharpening earns its place.
machine guarding and safe grinding guidance
abrasives and grinding wheel safety standards
Frequently Asked Questions
What are the most common mistakes in blade sharpening?
The recurring ones are holding an inconsistent angle, stopping before the burr is fully formed or fully removed, and jumping grits too fast. Each one leaves a blade that feels sharp but dulls within a shift. A marker test on the bevel shows whether you are actually hitting the apex, and a loupe check confirms the burr is gone before you move to polishing.
How does improper sharpening affect the temper of a steel blade?
Grinding generates heat at the edge. If the steel turns straw, blue, or gray, the temper has been drawn back and hardness drops in that zone. Those soft spots roll over instead of slicing, so the blade dulls faster than it did before you touched it. Light passes, fresh abrasive, and coolant keep the edge cool enough to hold its hardness.
Why does a blade lose its edge faster after DIY sharpening?
Most home and shop sharpening leaves a burr or a rounded apex behind. The edge looks keen under a thumb test but folds on the first cut. A micro-bevel that is too wide or too steep also weakens the edge geometry. Precision grinding restores the original bevel angle and removes the fatigued metal, which is why edge retention improves after professional service.
Can in-house sharpening lead to permanent machine damage?
Yes, when the blade goes back in out of tolerance. A guillotine or granulator knife ground past its flatness spec or under the minimum bevel width loads the machine unevenly. That shows up as chipped edges, worn gibs, and cracked knife holders. Once a blade falls below its minimum thickness, it cannot be sharpened again and has to be replaced.